Table of Contents
Preface
There are times that your DNS server will not return the correct IP address for a particular web or other type of server. While this can be frustrating, it’s often by design. Many times, you’re in the process of migrating a website from one host to the other and need to stage the site, make sure everything is working, then “cut over” to the new host. In this article, I’ll go over this process for Windows and Linux. If you’re using Windows and would rather watch a video, you’re in luck!
Windows
Step1: Open Notepad in Administrator Mode
Let’s start by opening the Start Menu and typing “Notepad”. You’ll need to right-click on the Notepad icon then select “Run as administrator”. When prompted, allow the app to make changes to your device (Click “Yes”)
Step 2: Open Hosts file
Now that Notepad is opened in Administrator mode, let’s open our hosts file. Select File –> Open.
You’ll need to type “C:\Windows\System32\Drivers\etc” into the Address bar and hit enter. Next, ensure you’ve got “All Files” selected as your view. Finally, select “hosts” and click “Open” :
Step 3: Edit the file
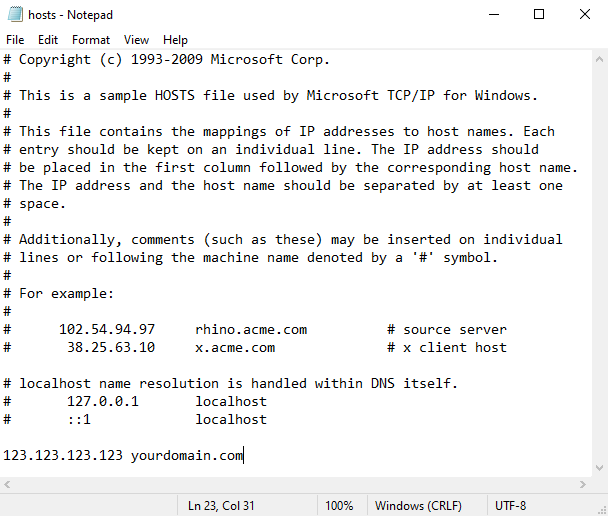
Your host should have provided you with an IP address and hostname to use. In this example, I’ve used “123.123.123.123” as the IP address and “yourhostname.com” as the hostname.
Step 4: Save your new hosts file
Linux
In Linux, editing the hosts file is much more straightforward than in Windows. Please open /etc/hosts using your favorite text editor. For this job, I like the simplicity of nano.
Step 1: Open Terminal
You’ll get a prompt to enter your password. Enter it then hit enter again.
Step 2: Edit Hosts file
Now that we’ve got the file open, we need to add the new IP Address and hostname. I’ve used 123.123.123.123 as the IP address and “yourhostname.com” as the host name:
Step 3: Save the file
Test hosts file entries
Now that we’ve edited our hosts file, we need to make sure that we’re attempting to connect to the correct server.
Step 1: Open a command prompt:
Windows- Click start menu, then type “cmd” and hit enter. A box will pop up and you’ll proceed with Step 2.
Linux- Open Terminal.
Step 2: Test with ping
Now that we’ve got our command prompt open, we need to run ping to make sure we’ve entered the information correctly. Using my previous example, we’re expecting the domain name/host “yourhostname.com” to resolve to “123.123.123.123”. In your cmd/terminal prompt, type “ping yourdomain.com”.
NOTE:In my example, I provided a valid domain name, but a bogus IP address. The pings SHOULD fail. If yourdomain.com responds to the pings, you’ve done something wrong. No worries, just try again! If you can’t figure it out, then I’ve been a bad coach and skipped over a step. Please let me know in the comments and I’ll correct my mistake!
Revert your changes!!!
Once you’ve finished testing your site, you’ll want to be sure to delete the lines you’ve added in your hosts file OR comment them out by adding “#” at the beginning of the line where you made the changes. This will ensure that your computer is attempting to access the server in the same way another computer would. If you forget to revert your changes, your computer will always and forever look to the specified server and will ignore any changes you make on DNS servers.
NOTE: I like to comment out the lines for important servers so that I have them around if I ever need them in the future. If you don’t think you’ll need the IP and server name saved in hosts for later, feel free to delete the line!

